A cut tut

A cut tut
I arrived at my studio on Saturday morning, wanting to make something large and filled with different kinds of leaves and stems. In the back of my mind was this sketch by Arounna, and this ink drawing by Etsy seller, Karen Gathany.
Step 1
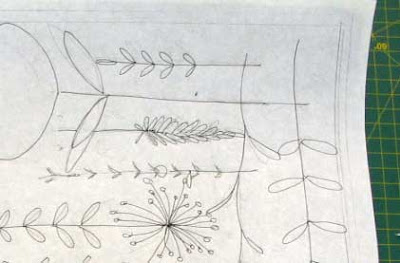
After looking at lots of flowers and plants in my books and magazines, I drew a 45 x 45cm composition of botanical specimens onto some thin white paper, and stuck it to black paper with a couple of pieces of sticky tape.
 Then I started to cut.
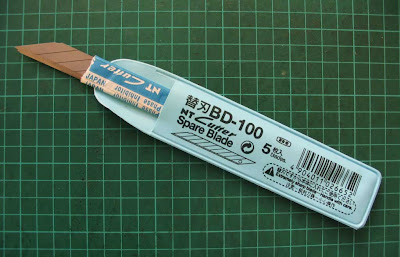
I use steeply-pointed NT cutter blades in a rather wonky craft knife. I really should get a proper NT cutter because it’s much more stable.
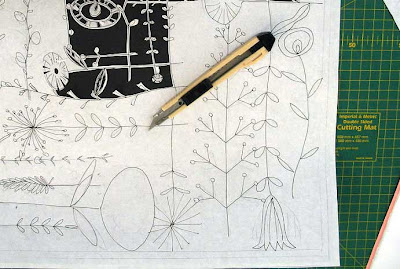
Step 2  Now it’s just about putting on some music and putting in the hours. I slice through both layers of paper, cutting on either side of the lines I’ve drawn, removing the white paper so I can see where I’ve cut. I tend to make lots of decisions and changes as I go.
Step 3 
Change the CD again, shake out your fingers, and keep on cutting…
Step 4 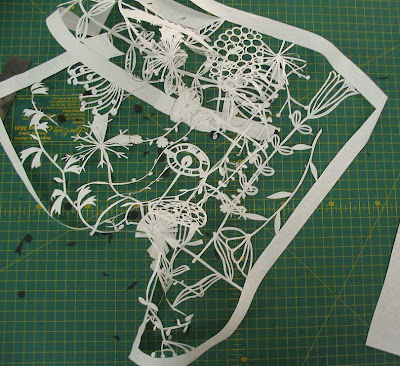
I like this part – I slough off the white paper guide, which remains largely intact, but very frail.
Step 5 
This part takes the longest, and I have to be so careful. Most of my cuts have not been close enough to a neighbouring cut, so now I carefully make release cuts to remove the negative spaces. The more negative space I remove, the more delicate everything becomes.
Step 6
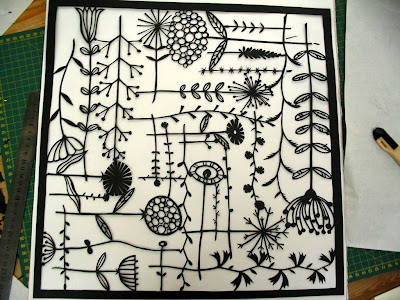
Finally! I finished without tearing anything or slicing anything off mistakenly.
Step 7 
Now I hang out the nearly-finished cutout on my line so I can look at it and decide what’s next. Mostly, I’m happy with this cutout, but some areas seem a little congested and could do with some pruning, which I’ll get onto today.
kat
er, um, wow! …no other words!
vlijtig
This tutorial is great! I was just going this papercutting a try. This will make it a lot easier.
Your papercut-designs are so beautiful!
vlijtig
This tutorial is great! I was just going this papercutting a try. This will make it a lot easier.
Your papercut-designs are so beautiful!
tiel
super cutter! I love that knife too..hate the scalpel knife!
I can really understand how you could get into that zone and spend an entire morning in your studio doing this.
julia
wow! I love making this kind of work too!!
that’s beautiful you could sell it as a painting!
Jo
Heather, you are giving Tord Boontje a run for his money 🙂
Lara
That is insanely fantastic – I can’t imagine the patience and dexterity that would require… and that your hands don’t ache for ages afterwards!!
lula cat
This is lovely!
If only I had the time and energy to get down to this type of thing after work! I love doing one thing for hours.
Hollabee
wow this looks amazing…you must have so much patience…awesome work!
Kristine
Wow, phenomenal. That is incredible work. And to think I now have one of your lovely tea towels in my kitchen. Aren’t I lucky.
Kristine
Lena
GORGEOUS heather!
really fun, i love it.
Lovely Paper
hello! congested? it’s perfect. seeing that makes me want to create another cutout! aw, but you’re so good at it… will you be selling any of these, hmm? hehe 🙂 just thought i’d ask.
Homegrown {& the Bug}
Um Heather, have I mentioned how awesome you are lately?!
That is seriously the most amazing thing I’ve seen in weeks! Your patience astounds me. And no pruning, that is perfect 🙂
PS – I didn’t get your email, just assumed you were mightily busy. Did I miss one?
Homegrown {& the Bug}
Um Heather, have I mentioned how awesome you are lately?!
That is seriously the most amazing thing I’ve seen in weeks! Your patience astounds me. And no pruning, that is perfect 🙂
PS – I didn’t get your email, just assumed you were mightily busy. Did I miss one?
whatchabuildin
WOW! this is beautiful! Are you going to screen print some??? Yes? I need another print to go with my birds print of your! Love it, keep it up!
-Heather S.
Kelly
a beautiful end product as usual. thanks so much for taking us through the process with you!!!
Kelly
a beautiful end product as usual. thanks so much for taking us through the process with you!!!
Abigail A. Percy
stunning heather, truly stunning….le sigh 🙂
Karen A. Chartier
WOW! That is just beautiful! What patience you have!!!! Just AMAZING!
jen
gorgeous – thanks so much for sharing your technique! not only do i admire the work, but also i admire your patience and dexterity!
erika
Fantastic! You really could sell it as a painting. Or as wallpaper! Ooh!
patricia
How gorgeous!! I think you’ve just inspired me to go do some cutting myself!
amy
Awesome! Who needs a die cutter!!
kit
This is so inspiring!!! I thank you for sharing with us.
I think I may get myself a new knife and “go for it.”
Your work is beautiful!
Heather Moore
Wow, so great to hear from all of you! Thanks for your positive comments, and for the ideas about what to do with these dang things. I must say though, it’s rather nice to make something sans purpose, for a change.
Laura Bucci
This is really neat. Thanks for sharing the process. I’ve been wanting to trace botanicals from photos, using Illustrator but maybe there’s something to be said for hand work. Beautiful work.
Jessica
STUNNING! You have really inspired me to do some cuts for my bedroom wall:)
Do you use any kind of special paper for this? I want to try, but I don’t know if standard/cheap construction paper would be strong enough…
thinkingmama
So beautiful!! I just posted some Valentine cutout templates on my blog but mine are lame compared to you cut paper designs!
alice
Thank you!
That was very generous of you to share with us!
Heather Moore
Jessica: I just use black construction paper, and I’m really pleased with its strength. I read the other day that Rob Ryan uses bible paper. No idea what that is, but it sounds fancy!
HeatherS and Dawbis: I think I must sell these sometime. Sorry for being so vague, but as I say, I’m enjoying making things just for the heck of it. But do keep an eye on my Etsy shop.
Cassi
Because of your beautiful work I’ve been giving this a try myself. I will never be in your league but thank you so much for the inspiration to try something new! Your work is absolutely amazing! I love it’s delicate and fragile beauty. Thank you for the tutorial too – so helpful 🙂
Billy
Wow! I don´t think it looks congested, it´s just plain beautiful!
Thank you so much for sharing the process.
PhatSheep Textiles
Wow.. you must be a very patient lady, although I can imagine once you get into the cutting zone it could be very relaxing:)
really appreciate you taking the time to tell us about your process, its always really interesting to learn how people work, thanks
c.rachel
W.O.W.
Thank you for posting this. It’s amazing work! By the way, what music was on?
You know what? That white paper guide is mighty lovely too.
ana margarida
Lovely post!
Francesca
truly lovely…and you have the patience of a saint!
Jesse
very nice tut – clear and concise!
planetjune
Stunning work! And your tutorial is so inspiring.
arounna
Heather – this is simply beautiful – you must sell these in the near future. As silkscreens on paper – a small edition. Thanks for the mention 🙂
natascha
Thanks for sharing! You’re my hero!!
Emele
Amazing! Are we allowed to know how long it took?
Sarah
It’s gorgeous!! I love doing things like this, but haven’t had time for years to do something so intricate. Kids and papercutting really don’t go hand in hand 🙂
Jodi
Wow! Thanks for sharing your design process!
michelle k
Do you think you would ever do a follow up tutorial where you turn a paper cut into a screen print?
3rdEyeMuse
I believe that I am in awe.
I tried my hand at doing a papercut this past week (it was thoughts of a Chinese tiger papercut that kept stalking me that prompted it). I picked a super simple design & was amazed by how difficult it actually was (though I half to admit I LOVED doing it). Thanks for sharing your steps. 🙂
flowerpress
To echo everyone – thank you for sharing your process – This is an exquisite piece.
jmanu
Beautiful art piece!
so delicated and harmonic cut
It’s always amazing to can see personal cuts and process.
Thanks for share !
Heather Moore
Thanks again to everyone for all the comments. I just want to answer a few questions:
C.Rachel: I was listening to Arvo Part’s Litany, John Tavener’s The Protecting Veil, The Indigo Girls, and also old recordings of my now defunct band, the Sunday Family.
Emele: I worked on this cut for about 6 hours with a short break to look for a Valentine’s gift.
Michelle K: If I could, i’d do the screenprint tutorial, but I don’t have the chops and will be getting a screenprinting friend to do the work for me. I’ll see if he’s amenable though…
Juddie & Godfrey
So wonderful! Thank you 🙂
Juddie & Godfrey
So wonderful! Thank you 🙂
Juddie & Godfrey
So wonderful! Thank you 🙂
Juddie & Godfrey
So wonderful! Thank you 🙂
tcarole
It’s beautiful. I have a little growing collection of paper cuts that I’ve found at estate sales and thrift stores.
Seems like if you used freezer paper to draw on and then used it as the top paper, you could then use that as an iron on stencil for something else. Or would the paper be too heavy?
sarah
I do alot of paper cutting as well, I do mine on big sheets of watercolour paper and go from there with it ( I’m a artist) Its alot of work, yours look good!
Wisdom.Courage.Love
that is amazing, have never seen anything like it!! Look forwarding to having a look at your blog…
Leanne Graeff
I love how the cutting process really creates the character of your work. Having such parameters allows a focus and consistency.
I only paint my silkscreen positives – directly on the acetate. I find that by limiting myself to that medium I am better able to express my own “hand”.
Thanks for the inside view! – looks lovely!
carly
I am amazed at the beauty of your work!
I have tried papercutting before and I have a lot of trouble cutting accuarately, especially curves. Can you give me some advice? Do you make several shallow cuts before the line is complete, or is there a recommended cutter I should try?
Thanks! Carly
jigsawjazz at gmail dot com
Heather Moore
Thanks again for the comments. A few responses to suggestions and queries below:
tcarole and Sarah: The freezer paper sounds like an interesting idea. I didn’t know you could use it as iron-on stencils. And Sarah, I’d love to see your cuts of watercolour paper. I really should experiment with different papers and see what works best.
Leanne Graeff: Thanks for your comments and insight into your process. I love the prints you make and am always impressed by how much you do in such a small space!
Carly: Cutting curves just takes practice, but I find turning the paper instead of trying to do it all with the knife helps too.
Jo
Heather – these would make the most beautiful blinds/screeny-things for e.g. bathroom windows… Maybe you could get them laser cut out of a thin smoky perspex or something… I’d order loads!
bowie style
ABSOLUTELY BEAUTIFUL – you are such a brilliant artist. i agree with those who have said you should sell prints of this 🙂
alice
Wow that is amazing!
Pina
You are a real master! I love it!
Shiny Black Shoes
WOW…WOW….that’s amazing! I don’t know what else to say! Wonderful!
cloud9design
so amazing…. love it.
Marissa L. Swinghammer
Beautiful and skilled work. Here I am using my mini exacto for stencils for my own attempts and you don’t even need such a specialty tool for much more intricate work.
Ticha
Wow… increible, beautiful, simplemente mágico.
Salu2.
maggienikole
really lovely.
Deckled Edge Bindery
Beautiful work. I’m always so impressed with people who do this well. Just lovely.
Mer
I agree: Wow.
Jaimee McClellan
AMAZING! To have the patience AND the time…I’m jealous!
industrialpoppy
This is not to be believed-it is beautiful beyond words.
Waterrose
Unbelievable! What an amazing talent you have…and steady hand! Thanks for sharing the process.
Kim at Thistle Dew
Hello! A friend shared a link to your site with me, and I just wanted to tell you how beautiful your work is! Your cutting is so fine and precise!
Have you ever used silhouette paper? It’s great, because it has a white back to draw the pattern on! It holds together well even though it’s very lightweight. I get mine at Dick Blick, and buy it by the pack for a pretty good price.
Good to meet you!
Kim 🙂
Heather Moore
Thanks again for all the lovely comments!
Kim, I haven’t heard of silhouette paper, but it sound like a great idea! thanks for the hot tip.
letrodectus
wow, this really seems like a lot of work. how long did it take you to cut all this? about 2-3 hours?
Heather Moore
Hi Letrodectus
It took a bit longer than 2-3 hours. It’s about a day’s worth of work.
Anonymous
Your work is wonderful and so elegant! I am glad to meet another paper cut fan. welcome to my world.
Julie
oups! I forgot to leave my name on the previous comment…didn’t mean to be anonymous!
Heather Moore
Hee hee. Thanks Julie, I was wondering what anonymous’s world was like. Would love to see your paper cut work too sometime. Can you send a link?
elsie
wow. very beautiful.love it. it looks amazing!
jgodsey
i was looking for an idea to try out an old technique called passe-partout, where the artwork is mounted directly behind glass and framed with fabric tape. i think your beautiful flowers would be perfect!
nogisa
Thanks for sharing your amazing work!
Annie
this is lovely! thanks so much for sharing this!
Kelly Darke
this is beautiful! and such intricate details – awesome!
Jess
WOW! that looks fantastic! Have you ever tried glass etching? I use a very similar technique (actually it is the same, except you pull out the design not the spaces! And i also put contact paper on the glass and cut directly on to it) That design would look AMAZING on glass!!!
nillakitty
Oh thank you soooo much! I was just recently searching for exactly this tutorial! Beautiful work!
Yujai
This is awesome!! Beautifully done! Thanks for the tutorial! I am recently in love with paper cutting XD
Dot
that is really incredible! your fingers must be so sore when you’re done! 🙂
Meera
Incredible:)It looks so simple..The amount of patience and precision you have is just amazing….I wish it was so simple to cut one small part…Hmmmm..
I am Meera from India…I was drawn to your paper cut art work….
Have a nice day
meera
ARTina
AWESOME! I am going to apply to graduate school for visual studies, but I’ve been sewing so long that I don’t have much of a visual arts portfolio. Your tutorial has inspired me to use this technique for a few art pieces. Kudos!
potatobird
Absolutely stunning and incredibly brave of you!! This is very inspiring. Thanks for sharing!
Doreen
WOW!!! This is absolutely amazing!!
Thank you…..you have inspired me to give this a try!
:)Doreen
çiçekçi
For sharing thank you very much good very beautiful work
kristina *
this is rather incredible. and so beautiful.do tell: so you do this without major swearing? if i tried, i'd probably not only cut my fingers but also use up all available swear-words and start borrowing some from other languages. wow.
NZBookgirl
Thanks so much for this. I've been looking at heaps of papercut work around the place but couldn't find out how to do it until I found you! I see someone has asked if you are going to do a screenprint of your papercut. Sometime it would be great if you put up some instructions about how you do this. I feel so ignorant but all this art stuff is new to me and I really want to get creating! Many thanks
Kate
Firstly, wow, that's beautiful -thanks for sharing. Secondly – the freezer paper story – do you have any ideas where to get it in SA? Sounds like a fun thing to have around but can't seem to find any.:)
çiçekci
WOW!!! This is absolutely amazing!!thankyou
Joan
Absolutely incredible. Love it. One question – how do you glue to paper now? What kind of adhesive works well on such a delicate papercut?
skinnylaminx
Hi there
Thanks for your comment on my papercutting. Actually, I’ve not done any glueing of my paper, so I’m unable to answer your question.
Best,
Heather