Ceramics transfers tutorial

Ceramics transfers tutorial
As promised, here’s a tutorial showing you how Jesse and I got our drawings onto ceramics last month, creating two dinner services for the Rooms on View show. You can take a look at my finished plates here and see Jesse’s here.
Now, let’s get cracking:
Step 1 – Get transfers made![]()
Getting transfers made was much easier than I might have thought. Just find screenprinters who will print in vitrifying ink on transfer paper, give them your positive, choose colours, and then pick up your stack of transfers. Jesse and I used JT McMasters in Cape Town, who were brilliant.
If you’re very DIY, you can also screenprint your own transfers, as long as you can get hold of the right ink and paper.
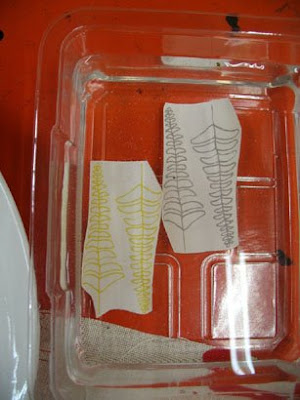
Step 2 – cut out and sort
![]() Using my sharp knife, I carefully cut the images from each transfer sheet, going fairly close to the edges of the images, but not so close that the image became spidery and unwieldy.
Using my sharp knife, I carefully cut the images from each transfer sheet, going fairly close to the edges of the images, but not so close that the image became spidery and unwieldy.
Then I grouped the cut images in old avocado punnets. I was working in three colours with loads of different images, so it was important to keep some order.
Step 3 – Place transfers
 This was a fun bit, but also quite overwhelming, as there are so many different designs you can put together with all those cut transfers. I found that using the same image (or a slight variation) in three colours gave a fantastic range.
I just messed around, placing the cut outs on plates, and when I was happy with a layout, I photographed it using my mobile phone camera. This was a great way to keep a record of a layout, as everything must be removed from the plate for the next step.
Step 4 – Soak transfers
Put the transfers into some water, and keep tweezers handy to get them out again (I used my fingers and they got irritated after a while). It doesn’t take long for the transfer to loosen from the backing paper. In fact, it’s important that they don’t soak too long, or they’ll lose their backing glue.
Step 5 – Apply transfers

Slide the transfer from the backing paper onto the plate. This is very exciting, because it looks fantastic straight away. The transfer is still pretty slippery at this stage, so it’s easy to slide around and place. However, don’t do too much sliding around, as you’ll lose the backing glue.
Step 6 – Remove water
 It is important to remove all the water from the plate and get rid of any air or water bubbles behind the transfers. I used my fingers to smooth out wrinkles, then used a sponge to get rid of water.
This is a bit of a tricky operation, and it’s very easy to shift the transfers at this stage. Pernickertiness is essential at this point.
Step 7 – Dry the transfers
 Leave the transfers to dry for a day. It will be hard leaving all your studio full of beautiful plates, I warn you!
Step 8 – Firing
 Now (and this is where Jesse and I almost came short), you need to find a friendly potter who will let you use their kiln. Tessa Blem Gawith in Muizenberg was kind enough to take us in when we had almost lost all hope! Here is her studio with her trusty assistant, David.
 Plates get stacked inside a kiln, and are then fired to whatever temperature your transfers require. Ours required a temperature of 800 degrees Celcius.
Step 9 – Ta dah!
 It’s magic! The plates come out of the kiln, cool down, and then they’re ready to eat off.
The next step?
I know there’s still lots to learn about ceramics transfers, and I’m looking forward to finding it out as I go along. Jesse and I are planning to do more for an exhibition at Curious, Whetstone & Frankley, opening in early July, so watch this space.
Cicada Studio
Thanks for this! Who knew? I love seeing the process.
High Desert Diva
Cicada sent me your link…I’ve been wondering how this was done. Thanks for the tutorial!
HB
Thank you, thank you, thank you it would have taken me another thousand years to finish my research and your pictures are much better than the ones I’ve come accross!
HB
Thank you, thank you, thank you it would have taken me another thousand years to finish my research and your pictures are much better than the ones I’ve come accross!
painted fish studio
wow. thank you so much for sharing! the plates are so beautiful, and the thought of creating my own is within reach.
Julie
Thanks for posting this tutorial! Your plates look amazing!
LINDSAY
Thanks for sharing this! I will definetly be bookmarking this for future reference.
LINDSAY
A quick question…do you have any advise on where to obtain the blank ceramics? This project really excites me 🙂
Heather Moore
Hi Lindsay
I live in South Africa, so my advice on where to find blank ceramics won’t apply to you. I just went to the Continental China factory shop, and then also to a local catering supplies shop. Next time round, I’m planning to collaborate with a potter and get ceramics custom-made though.
– Heather
Tina
Thanks for the tutorial. I’m new to screenprinting but I’ve been wondering about printing transfers. Yours look so good! I can’t wait to research and find the supplies and try it out.
Uncle Beefy
Oh m’goodness, Heather! These are FANTASTIC! So wonderful! Good for you!!!
As a silkscreener myself, I’ve wondered about ceramic transfers so this is a great start! If I can get the right paper and ink I’d love to try this out! Woo-hoo!
Side note: You (i.e., your tea towel is in the latest issue of “O at Home”…Oprah’s home magazine) Didn’t know if you knew but congrats! 🙂
(Finally, thanks for your sweetness and kind words, Heather. You are an inspiration! Seriously.)
Billy
Congratulations, your work is gorgeous!
Although this isn´t something one can try right away at home, it´s great to understand the process and actually see the “making of” images. Thanks!
Lara
oh my gosh heather, you are so incredibly generous for sharing this information!! I have a friend with a kiln in the country and have always wanted to do a collaboration with him, but never knew how to do this!
Lara.
Lara
oh my gosh heather, you are so incredibly generous for sharing this information!! I have a friend with a kiln in the country and have always wanted to do a collaboration with him, but never knew how to do this!
Lara.
Freshly Found
So interesting. Thanks!What an exciting process.
Freshly Found
So interesting. Thanks!What an exciting process.
A Print A Day
eee! i love it! so this is how it’s done! you’re so generous to share. i’m not a ceramicist, but i admire people who do it 🙂
Jesse
Nicely constructed tutorial!
I did it slightly differently: used scissors to cut out; didn’t take all the transfers off the plate before soaking, but soaked them one by one and applied them, leaving the dry ones in place (and marking the spot where the transfer had to go with a drop of water). Taking a photo would be a lot quicker! I slid them off the backing paper while still in the water – the transfers seem to be stronger than you think.
Computerarte
beautifull work you have here!
great tutorial!
FruensWerk
SO COOL…making your own transfers…Great tutorial 😀
Anja
Great tutorial! I´m a ceramicist myself but I have never worked with transfers. I have been wanting to try it out though.
Do you know what kind of ink and paper that is used for making the transfers? It would be fun to make them myself, but I´m not sure of what kind of materials to look for.
julia
thank you so much for sharing this!!
Amy C
thanks for so generously sharing such a well documented tutorial. Love it.
ninainvorm
Great tutorial! I use the same technique, only I screenprint the transfers myself. For me, applying the transfers to the ceramic surface is the hardest part. Especially when the ceramic surface has curvy shapes, I find it hard to completely get rid of air bubbles. And you only need a few of those to ruin your whole image… But as far as I can see, you don’t have that problem, because all your transfers look great!
Dovely
I’m very interested in this process as well! Your results are phenomenal!!
Would you be so kind as to share your sources for inks and transfer paper?
Best of luck with the show!
::{J}::
I love this idea!! Thanks so much!
Stephanie
Oh this would have been perfect to make as a gift for a friend’s upcoming wedding! Unfortunately after making a round of calls to all the local screen printers, no one offers that service. 🙁
Any alternate suggestions???
Ansley Bleu
How exciting. They came out beautiful.
pippijoe
They look amazing – I’ve always wondered how it was done… thanks for the tutorial!
Spin Spin
Thank you so much for sharing and for making such beautiful stuff – what an inspiration/revelation. It must have been so exciting seeing them all done!
Anonymous
Absolutely wonderful. Very creative. Can’t wait to give this a try but being a novice – what is meant by ‘blank ceramic’. How do I know what plates etc could be used? Luckily have access to a kiln. I am so excited – thank you so much for sharing your knowledge and expertise!! Debar
Mrs.French
Oh how I love these! I would love to make my own, but I am pretty sure there is no way they could ever be this wonderful.
Larktavia
I spoke to one guy here in Berkeley, CA and he didn’t do this kind of work any more since it’s expensive to keep around for small runs. However, I did poke around on the internet and found this site: http://www.easyceramicdecals.com/
While I don’t think you can upload directly to them you can mail them a disc with your art. The site says there is no extra charge for small runs. Now all I need to do is find a place to fire some plates!
Larktavia
I keep marveling at this project. It’s so simple and so extra cool. If anyone in the Berkeley area tries this out, please contact me! Maybe we can go in together on supplies or kiln expenses. I am so glad you posted this in the summer. If I can get my act together, I can make plate sets happen for Christmas!
Stephanie
Larktavia, I spoke with someone from the site you mentioned today and you can contact them to upload a digital file. From what I can tell thus far it’s a pretty quick and relatively cheap process! Thanks for finding that. 🙂
Alex Kirkwood
thanks for sharing! i was wondering how you clever girls managed this. i’m really looking forward to trying this for myself.
natascha
Thank you very much for the tutorial. It’s inspiring and very helpful!
mizu designs
our plates just look amazing. and this tute was soooooo cool to read through. if i can find a potter with a kiln i’d love to try.
towhee
what a great tutorial! thanks for posting. love your designs. are there any limitations on the plates that you have used? looks like they are porcelain? this is so inspiring! now to find a vitrifying ink screen printer….
honey
How beautiful, and I had no idea that such a technique was available to me! I have a ton of old plates that could use some sprucing up. Is there any problem with using plates that are coloured, or were made in the ’60s?
Adrian
this is a nice tutorial. but i’m wondering what kind of ink, is this available in computer stores? and is that really water that you used? some said they some kind of chemical. pls. e-mail me. adelima_5@yahoo.com
Paula Prass
So kind of you! I have handpainted my designs on ceramics in the past, but how easy to do when you need to repeat. So generous of you.
Anonymous
I have done ceramics since the early 80’s. I owned my own retail shop and fired decals on tiles for bathrooms and kitchens for local stores. There are lots of companies out there that make decals. Just type in decals, but make sure they are for ceramic pieces. I once did a party for Engelbert Humperdinck and we made coffee cups. sombrero hats that were chip and dip bowls and magnets and had our decals made and they were rather inexpensive.
JSchwa
For those in the US, you can go here to have your stuff printed.
The price seems reasonable.
http://www.easyceramicdecals.com/index.php
Colargolet
Thanks for a wonderfull tut!
Ashley
Absolutely beautiful!! This is amazing! Definitely on my long term to do list now!!
T h a n k Y o u ! !
LM
Heather – hello from London Town, where I was searching on the internet about ceramic transfers, and – ta dah – there you are, top ten in google.
I am making candlesticks…
Lots of love, your work is looking fantastic!
Lucinda
*tresdivine*
they looked gorgeous! thanks for the inspiration!!
Littleclouds
I always wondered how people did this so thanks, it looks so fun and easy but finding someone with a kiln to borrow would be a hard task for me! Does it feel bumpy like when you slide your finger across it? Your plates look great too!
fundi
love this im so coming to capetown to see you heather i want to get my hands dirty with design great work and thank you for the tutorial
Jen Castle
Thanks for info – I googled ‘how to’ and your article came up. I am in Kilkenny, Ireland (4yrs now) and originally from Durban! So was delighted to see your are in Cape Town and delighted to see lime green avo containers from Woollies! I still have the ones I brought over! Looking at transferring my drawings onto ceramics. Cheers Jen
skinnylaminx
So pleased my tutorial has been helpful, and how funny that you should recognise those Woollies containers! I still squirrel them away every time I buy avos – they’re so useful! Good luck with the ceramics, xx
MissyMoo
Will you be selling these transfers in your store? I’d like to decorate some plain Corelle plates and your designs are beautiful…
skinnylaminx
Hi there
That’s a great idea! I’ll list some of my transfers in my store soon. Please bug me if you don’t see them soon.
MissyMoo
I’m still interested in those transfers if you can find the time…
Edward
This is really amazing!!! The easiest process for ceramic printing that I have come across till now. I’m really happy you shared this tutorial.. Going to try it very soon!!
Joanne Sandler
Hi Heather
About transfers on ceramics.
Where do you buy the transfer paper and which screen printers would you suggest in 2018 (i see this is an old post)?
I gather that your transfers are placed onto glazed ceramics and then re-fired. Is this just a low temperature firing?
Best
Jo
Shannon Phillips
Hi Heather
Thank you for all your Ceramic Transfer Tutorial.
I have tried without success to contact Mc Masters Printing, without success?!
Please could I have their email address or phone number?
Many thanks
regards
SHANNON
skinnylaminx
Hi Shannon
It’s been years since I last dealt with McMasters, I’m afraid, and so I’m in the same situation as you, unable to make contact. Possibly the business has closed since I posted this tutorial all those years ago.
All the best,
Heather